Game Setup
In this step, we will do a clean installation and configuration of the game, which is required for the guide.
Requirements
At least 13.0 GB of free drive space.
A text editor (Notepad++ is recommended, but the default Windows notepad will work).
A Nexus Mods account (a Premium subscription will allow uncapped speeds).
Uninstalling the Game
If you do not have the game installed yet, skip this step.
Steam
Open Steam and go to your Library.
Find The Elder Scrolls III: Morrowind in the list.
Right-click on it and select Manage -> Uninstall.
Navigate to Steam\steamapps\common\ and, if present, delete the Morrowind folder.
GOG
Open GOG Galaxy and go to your Installed games.
Find Morrowind in the list.
Right-click on it and select Manage installation -> Uninstall.
Navigate to GOG Galaxy\Games\ and, if present, delete the Morrowind folder.
Installing the Game
Install Location
A clean installation is not only required to get rid of any potential leftover mod files, but also to make sure the game is installed in a safe location. Here is what you need to know when choosing where to install your game:
Avoid any default Windows folders: This includes but is not limited to C:\Program Files, C:\Program Files x86, your Desktop and your Documents folders. This is due to Windows UAC (or User Account Control), which heavily monitors and protects these folders. This can cause many issues with the game and any modding tools. An example of a safe location is C:\Games\Steam and C:\Games\GOG Galaxy.
Install on an SSD if possible: Having the game on an SSD will drastically improve loading times and decrease stuttering.
Steam
We will use a tool called Steam Library Setup Tool to create a new Steam library folder outside of any default Windows folders. If you already have Steam installed outside of any default windows folders then skip this step and simply install the game to your custom Steam library.
Completely exit out of Steam using Task Manager or System Tray.
Download the steam_library_setup_tool-3.2.exe file from here.
Once downloaded, run the file and add a new entry by clicking Add Row.
Type the chosen path under Path, e.g. C:\Games\Steam
Click Accept then Yes if prompted to create a new folder.
The tool will ask to exit, select OK.
Open Steam and go to your Library.
Find The Elder Scrolls III: Morrowind in the list and select Install.
Under Install to:, select the library folder created with the tool - the second C:\ entry if you are installing on the main drive.
If you still do not see your new library, restart your PC.
Select Next then wait for the install to finish.
GOG
Open GOG Galaxy and go to your Owned Games.
Find Morrowind in the list and select Install.
Under Install to, select C:\Games\GOG Galaxy\Games.
Select Install then wait for the install to finish.
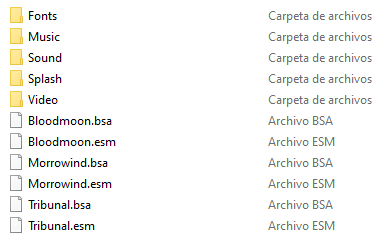
Note that the GOG release of Morrowind ships with files we do not need, including the official plugins Bethesda released for Morrowind. We will install a merged and fixed version of these plugins in the guide, so we don't need the original files.
Delete the following files from your Morrowind\Data Files folder in order to free about 700 MBs from your install:
BookArt folder.
Icons folder.
Meshes folder.
Textures folder.
All .esp files. There should be 8 of them, corresponding to the official plugins.
All .txt files. There should be 8 of them, corresponding to the official plugins.

Post-Installation
Official Map
Morrowind originally shipped with a detailed map which is absent from digital stores. You can get this map here.
Key Terminology
Now that the game is installed, there are two folders from it that will be referred to in the guide often:
Root folder: Where the game is installed.
Steam\steamapps\common\Morrowind
GOG Galaxy\Games\Morrowind
Data Files folder: Where all of the game's assets are located.
Steam\steamapps\common\Morrowind\Data Files
GOG Galaxy\Games\Morrowind\Data Files
Enabling File Extensions
By default, File Explorer will not show file extensions (such as .exe, .dll, or .esp). These extensions are very important when going through the guide, so it is highly recommended to enable visible file extensions:
Open File Explorer.
Select the View tab at the top.
Enable File name extensions in the Show section.
Last updated